


Succulent Propagation: FAQs & Troubleshooting
- Succulents & Propagation
- Dec 7, 2022
- 15 min read
Updated: Mar 8
In here we have gathered the most frequent questions that are asked about succulent propagation.
FAQs
"How do I start propagating succulents?"
By leaf, cutting, or a stem piece. For detailed information with visuals, jump over to our ULTIMATE Guide To Succulent Propagation to learn the how-tos on gathering leaves or cuttings for props.
“Do I plant the individual leaves in soil?”
No, there is no need to bury the node. Most leaves can just be laid horizontally on the soil, this will allow the roots from the nodes to find their way down into the soil. It’s ok to flip the leaves upside down, lay them on their side, or poke the node into the soil to get better contact. You don’t want to bury it deep, but better contact means the cutting can better sense moisture when you water. You can always flip it back over later once it gets going, but you don’t have to, the plant will work itself out.
You can also just toss them in a box, open jar, or container! They do not need any soil to create pups. Try air propping.
→ Our Tip: Try laying them facing in the same direction they were growing on the plant because most of the time the roots will shoot down and the babies will shoot up (but not always, this isn’t a fast and true rule). Sometimes the leaves are going to curl and this can cause a gap between the node and the soil.

“What if it's a cutting with no roots? How can I root cuttings?”
Cuttings can be rooted the same as leaves: in soil, air, over water, etc. If planting in the soil just poke the stem end down into your potting mix and water when the soil dries until you see evidence the plant is taking up water. If you prefer to root the cutting before potting you can lay it somewhere safe (out of direct sunlight) until you see fresh roots forming, use the hover method, or even prop it in water for certain species. Depending on the plant, environmental conditions, and time of year roots may sprout quickly or could take up to a few months to form.

→ Our Tip: Callous the end first before putting in water or hover propping. For super easy propping we like to place a cutting directly into succulent soil, it will root all its own. This is our preferred method.
“Should I water the leaves or cutting?”
There is no one right answer. Common advice states “no water before roots” or “no water until your mother leaf dries up.” While this advice may work for many growers, for others it can lead to failure. Once your stem and leaf cuttings are calloused there is no reason not to water, and humidity promotes rooting. So, if you aren’t getting roots or your cuttings are drying out try watering when the soil dries.
For leaves
Those big, juicy leaves are a powerhouse of energy for the “babies” that form at their base. Some growers prefer to ignore their leaves until the “mother” leaf has dried up and all that’s left is the new “pup”, and that’s fine. But this won’t work for all of us AND keeping that leaf hydrated has its benefits. It can photosynthesize, it acts like backup water storage for the plant, and it will thin out and look dehydrated when the plant gets thirsty, acting as a great gauge for when to water. We recommend experimenting and seeing what works best for you when it comes to watering.
→ Our Tip: The roots will bury themselves in the wet soil, do not water over the leaves themselves. Watering over the leaves could cause them to decay/rot if unable to dry properly.
For cuttings
If the cutting is calloused it is safe to water. Don’t leave your cuttings to sit in dry soil if they appear thin or dehydrated, instead water when the soil is dry until you see signs the plants are taking up water, then begin reducing watering frequency to an as-needed basis.
“How often do I need to mist?”
Instead of lightly spraying the soil many times each day, it is acceptable to wet everything more infrequently. Since succulents can not absorb water through their leaves and standing water on them can cause mildew or rot, you also need to have a mechanism for the surface of the leaves to dry if you choose to mist. When you're propagating outside, the breeze will aid, but indoors, you should install a ventilation system or utilize a puffer tool.
Misting is far more labor than is required, but if it suits you and produces results, there is nothing fundamentally wrong with it.
Applying mist in an environment that is already humid or where there are lots of fungal spores might not be a good idea for your environment, so use your best judgment.
While misting is fine at first once the prop has rooted you should start deeply wetting the substrate. Shallow watering promotes shallow roots. You want the roots to shoot down into the soil so they can spread out, absorb nutrients, and take big drinks.
Continual misting or light watering isn’t going to allow this to occur, and you’ll likely end up with the roots sprawled along the soil surface instead of bedding themselves deeply.
If this is already happening, don’t worry. Take a chopstick and dibble a little hole in the substrate. As gently as you can feed the roots into the opening, and water. The soil should settle in around the roots, but if not use your chopstick to push just a small amount over them to hold them in place until they can take hold.
→ Our Tip: If you continue to water the mother leaf while it is producing a baby you can refuse the mother leaf again for more props. Simply break the baby off when it is large enough and reuse the ‘mother’ leaf
“When can I plant this leaf prop?”
This is maybe the most commonly asked question. If your leaf propagations are laying on the soil they are planted in, they only need an inch or two (3-5cm) of soil depth to get going. More is ok, but no need to go nuts, especially if you are transplanting them afterward. You can place them all together or individually, all personal preference. You can shift them between trays or into individual pots as they hit different milestones (roots, leaves, a certain size, etc), whatever works for you and feels right.
→ Our Tip: To save space, we prefer to leave them together in a tray until they start to crowd one another because as they start bumping each other they’ll begin stretching to gain an advantage in light exposure over their neighbors.
→ Pro Tip: If you’re going to be transitioning your propagations outside or into direct sun do not forget to slowly harden them off, keep in mind that small, tender plants dry out quickly. The more sun they receive the more water they will need.
“Can I put my props under grow lights or in the sun?”
Yes and no! Small plants, especially tiny rootless plants, dry out quickly since sunlight is always hot. A cool morning sun would be acceptable. A well-insulated window that receives only a little afternoon or evening sun might also be acceptable. Use caution if the sun exposure gets too hot because it can quickly dry out little, delicate plants. It depends on your climate, the time of year, etc., and how much sun is safe. You can start exposing them to more sun as soon as they start to root and grow. Plants should always be protected from the direct sun before being exposed. Some grow lights can generate a lot of heat as well, but using LEDs will result in a significantly reduced heat output, so you shouldn't have any trouble positioning your leaves.
→ Our Tip: Always harden off your plants first to direct sun or they will burn.
“What succulents can I propagate by leaf?”
We were unable to compile a complete list. Echeveria, Graptoveria, and Graptopetalum are a few examples of succulents that may reproduce through their leaves nearly without fail. Aloes are among the plants that can never be propagated via a leaf cutting. Certain ones, like some Aeonium, can also technically reproduce by leaf, but they do it slowly and require a lot of work from the gardener. The hybrids come next. While Gasteria reproduces through a leaf, Aloes do not, so many Gasteraloes do. If you’re ever unsure we are here to help!
“My leaf broke. Will this broken leaf propagate?”
In general, most growth comes from nodes, so most leaves won't propagate without one. If the leaf is broken at the tip and not the node, it should not be an issue. Certain plants, including Kalanchoe and Sansevieria, can be multiplied through leaf segments (leaf cuttings without a node), but this is less common. We have also observed in the group where a rooted Crassula Ovata produced a pup from a tiny hole in its leaf. And ghost plants (and their hybrids) have been persuaded to pup from the cuts of rooted leaves, so there is likely more to this than we know. With a node anything is possible, something you might have written off could pleasantly surprise you!
Check out Succulent Garden’s YouTube for awesome videos on propagation.


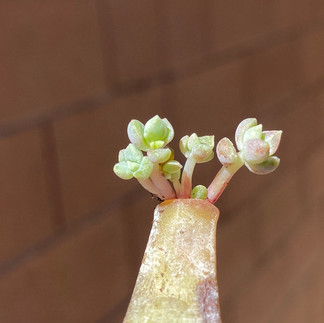
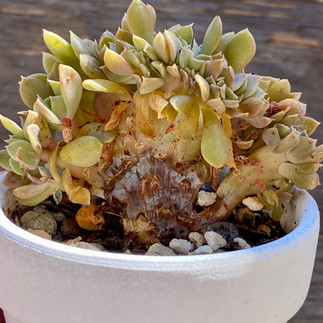
“My props have multiple heads, is this crested? Is this normal? Do I need to separate them?”
A plant with multiple heads is not the same as one that is crested. Many times leaf propagations will produce multiple heads, called a cluster. The parent plant's genetics appear to have a greater influence on how many heads you obtain than any other factor. Some species are renowned for clustering, while in other cases it only occurs between individual plants. Since the plant only has a limited quantity of energy to distribute across all the growth points, the individual heads of clusters grow more slowly. They will eventually be able to be separated if desired, but not until they are MUCH bigger. The larger the heads are the better for removal.
→ Our Tip: A good rule of thumb is to let the individual heads reach at least an inch in size before cutting. In many cases, as they spread out they develop their root systems, waiting until this happens can make the job of separating easier.
Cresting is a meristem mutation that often causes the widening of the stem, altering the plant’s growth habit [how the leaves are positioned on the stem and changes how the plant looks in general]. Early on in a cluster the individual stems may fuse and appear crested, but as the plant matures they will eventually separate into distinct, independent heads. In a crest the central growth point stretches, making it impossible to distinguish one single point of growth. If you can make out the individual growth points or center of each head the plant is not crested.

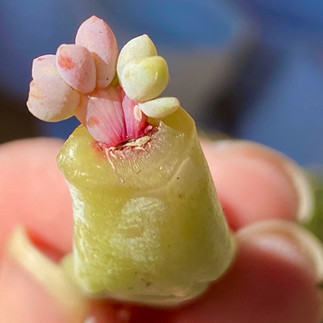

Crested succulent leaf prop vs. succulent leaf prop with multiple heads
“Why are the babies growing on the leaf edges and not at the node?”
Your plant is most likely a type of Kalanchoe, a genus of plants native to Madagascar and tropical Africa. Many of the species in this genus reproduce asexually along their leaf margins, and this type of baby is called a “plantlet.” Lay these leaves flat on the soil so the plantlets will root themselves. You may even get some new growth at the node end as well, but with so many babies growing these leaves work hard and may therefore dry out before this happens. That’s ok. Tip: You don’t need to take cuttings to propagate these Kalanchoe. Eventually, you’ll notice plantlets growing all over your plants, they’ll fall into the soil once ready and from there, many will grow into mature plants on their own.
→ Our Tip: You don’t need to take cuttings to propagate these Kalanchoe. Eventually, you’ll notice plantlets growing all over your plants, they’ll fall into the soil once ready and from there, many will grow into mature plants on their own.
“My leaves have roots but no babies, what’s up?
Naturally, the sight of new growth on their leaf propagations—little babies—excites everyone the most. If all you have are roots, don't worry the roots are good! Your leaves may now hydrate, get nutrients, and even grow. After all, they are living plants. When they are ready they will push out new leaves as well. Whether you get roots or leaves first has more to do with humidity and the individual plant than anything else. So you don't need to pull the roots off or stop watering. It’s best to let the plant do its thing and wait it out. Sometimes it can take months.
When leaves emerge shortly after root removal, this indicates that the plant was well into the process of making those leaves. If you pull out the roots and nothing happens, it's because plants don't produce leaves in response to root loss (root trimming stimulates root growth, and leaf pruning stimulates leaf growth).
→ Our Tip: Be patient. Let the plant do its thing and wait it out.


“My leaf is drying out with no baby, what do I do?”
If your leaves are becoming thin, wrinkled, or otherwise dehydrated it’s because they are using more water than they are absorbing; if too much is lost they will simply wither and die. To slow this process down, keep delicate cuttings and transplants out of the scorching sun's direct rays, increase watering, and if it's really hot, best to probably move them. For this reason, spring and fall are typically the greatest seasons for outdoor propagation as temperatures tend to be mild.
Note: Please be aware that water loss cannot be stopped after a certain point. Your leaves won't grow back if they have gotten so thin that they are translucent or papery.
→ Our Tip: Avoid placing propagations (or any plants) next to sources of intense heat, such as vents, heaters, or radiators.
“The mother leaf is dry and the babies have no roots, what now?”
Moisture encourages roots. When they detect it, plants will shoot out roots to absorb it. If the environment is dry plants can try to save energy and postpone rooting until the growing conditions improve and are more hospitable. Keep the soil moist until the plant shows signs of taking up water. After that reduce watering to when the plant appears thirsty. This can entail daily watering in dry climates and less watering in more humid climates. If growing outside, keep young propagations shaded until established, then transition to appropriate sun conditions as the plants become large enough to handle it.
“Why have my leaves rotted?”
If your leaf cuttings have rotted there are a few potential causes.
Likely, they may not have been healthy at the time of collection. They may have seemed healthy but that doesn’t mean they were.
Undetected pests and or fungal issues.
Many pathogens cause rot, sadly the damage is done long before we can see the evidence.
They may have been exposed to pathogens before callousing, even during collection.
It's a possibility that you need to adjust your propagation methods or environment, for example, rotting can also be caused by overexposure to heat or water sitting on leaves with no way to dry.
→ Our Tip: Leaves do not absorb water, only their roots do. Try not to let standing water sit on your leaf props to avoid rot. Do your best to collect cuttings from healthy plants and sterilize your hands and tools before collection.
“It’s been weeks and nothing, when will my leaves/cuttings start growing?”
It can take days, weeks, or even months for roots or new growth to emerge. This is because cuttings taken from dormant plants are dormant cuttings, and certain pieces grow slower than others. Unless they rot or dry to a papery husk, just keep waiting.
“My plant is rotting, can I save it through propagation?”
Maybe. Numerous microorganisms cause rot. Just like when a person is ill; some infections are localized, while others spread throughout the body. With decay and overwatering, the harm may already be done before it becomes evident. Only time will tell.
To attempt a rescue mission, start by cutting as far above any blackened, rotted, or mushy sections as possible and setting the cuttings out to callous. Wash your hands, sanitize your utensils and pot, and discard any diseased plant materials—do not compost.
→ Our Tip: Before re-potting determine whether changes to the lighting, potting medium, or watering practices are required. Once calloused, continue with the standard cutting-rooting procedures.
→ Pro Tip: Because many pathogens are soil-borne and highly contagious it’s a good idea to re-pot any affected by rot individually, but be sure to only use fresh new substrate. If the rot returns do not blame yourself, remember that some infections spread beyond what we can see. Throw out the plant and any infected soil, then start fresh with all your newly gained experience.

“Why are my cuttings wrinkled?”
Some wrinkling is normal! Your plants don’t yet have roots (or very few) and they need water to produce the energy to make the roots they need to rehydrate. They’re going to take that water from their leaves and stems until they’re rooted enough to plump back up, this results in wilting and wrinkling. They may even completely reabsorb some leaves fully throughout the rooting process. Species, environment, and size of the cutting will affect how severe wrinkling and dehydration become. We don’t want the water loss to be severe, so it is important to provide extra TLC to tender cuttings and transplants with extra shade, water, and cool temperatures.
“When can I remove these offsets (“babies”) on the stem or base of the plant?”
Even though offsets are whole plants that can live on their own when they initially appear, they depend on the parent plant for nutrition. Offsets can be taken at any time, but in a perfect world, they would be at least one inch in size and have developed some good roots when you gather them. Give it time to grow if it appears too young with only a few small leaves. [It is more likely that the plant needs more water, nutrients, or space if the offsets appear to be depleting the parent rather than removal.] Increase watering and fertilizer application to the parent plant and the offsets will benefit also.
If the “babies” are appearing from bare nodes or between leaves they are likely side shoots or branches and not offsets. If taken as a cutting they will root and grow but before removing them check to make sure they aren’t part of your plant’s natural growth habit. If you do decide to take cuttings, allow the growth to reach at least a semi-mature size before removal.
“Should I use a rooting hormone?”
You can, but you certainly do not need to. Succulents contain all they need to reproduce within their leaves and stems.
→ Our Tip: Keiki paste is not the same thing as a rooting hormone, it contains a different type of growth hormone called cytokinin that promotes shoot growth. Use it on your bare stems to produce lots of new heads and side shoots. Be careful, a tiny bit goes a long way!
Note: Using too much Keiki paste may cause mutational growth.
“Can I root my plants with cinnamon, honey, or [insert food item]?”
Products like sulfur, cinnamon, aloe vera, honey, etc. although commonly referred to as “rooting agents” these all do not contain any actual rooting hormones and therefore cannot promote rooting. This myth has persisted for a very long time despite being debunked by science over and over again. And you are probably going to continue to see it plastered and spread all over the internet, in debatable blogs, and group members' comments until the end of time. But it doesn’t matter, this isn’t disputable. A substance either contains hormones or it doesn’t, and these items simply do not.
There’s absolutely nothing wrong with using this product, but understanding the distinction between a rooting hormone and an anti-fungal is important. If an anti-fungal is applied in place of rooting hormones on a difficult-to-root cutting the desired effect won’t be achieved and you may lose your cuttings. What’s more, if you’re sterilizing your tools, washing your hands, callousing your cuttings, and otherwise observing good contamination prevention you may not need an anti-fungal any more than you need a rooting hormone. Succulents are so drought-tolerant that we can lay them out to dry for days or weeks, to minimize the risk of infection. Try doing that with hydrangea and it will be dead in 3 hours. Now if you have an a leafctive outbreak in your collection, if you’re callousing large cuts that are going to take a long time, or if fungal spores are prevalent in your area, applying a protective barrier to all cuts is a good idea. If you’d like to use something, sulfur is probably the best bang for your dollar. It’s natural, cheap, effective, and sold everywhere gardening supplies are found. Cinnamon is another popular choice but the type of cinnamon with strong anti-fungal properties (Ceylon cinnamon) is pricey.
If you’d like an in-depth explanation of this topic, please check extension websites or visit the blog “Garden Myths”.
Note: All this said, please don’t think we are telling you not to use these products or that they are bad. Because while these products do not contain rooting hormones they do have varying degrees of anti-fungal properties. This matters because fungal pathogens are a common cause of failure in cuttings. So while these products can’t help your plants develop roots they can protect your plants. If it works for you, keep using it.
Our Tip: We love using cinnamon to dip the ends of our cuttings in to keep any fungal infections from happening before planting in the soil for propagating.
Do you have a question that isn't answered here? Ask us to include it!
Comments